
Introduction
A rubber ducky is a tool that can be used to takeover most computers just by being plugged into them for a few seconds. How it works is an attacker plugs a USB into a computer, this USB acts as a keyboard and injects keystrokes at superhuman speed. Often these keystrokes are commands that tell the victim computer to connect itself to the attacker’s computer (aka a reverse shell).
This is a very powerful tool, however I wanted to take it a step further. I wanted to do all of the above but instead of a USB, I wanted to plug an Android phone into a computer. After heavy research and a month or two of messing around with an old Android phone I was able to recreate it. This guide will take you through the process of doing the same, however before we dive in I would like to provide an important disclaimer.
This post is for research and educational purposes only. I do not take any responsibility, in regards to the actions taken by readers of this article. Never attempt to hack a device for which you do not have the required permissions to do so. It is highly illegal and I do not support it.
I also do not take any responsibility for any damage to hardware that the user may cause, rooting your phone and playing with the kernel not only voids your warranty, prevents usage of banking apps and may lead to bricking your device causing it to be unusable, perform these actions with these risks in mind at your own discretion.
Requirements
- Rootable Android Phone
- Android USB Cable
- Odin
- ADB
- ADB Drivers
- Linux
Rooting
What is rooting?
When you use a phone you are not an Administrator on the phone, you are a User. Rooting is the process of unlocking full Admin privileges (also known as Root Access) for your phone.
How do I root my phone?
This process is very different depending on the type of smartphone you have. Different companies and suppliers impose different restrictions on phones.
The general process I have followed is the TWRP(Team Win Recovery Project) + SuperSu method. This process is slightly risk and may result in bricking your phone so perform it with caution.
I will be going over the method I used to root my device. It will be widely different for your own device so I highly suggest looking up a tutorial for rooting your specific device model.
To root my device I downloaded Odin on a Windows machine (Odin is not available for Linux and I highly recommend not using a VM to utilise the software), I then found an appropriate version of SuperSU & TWRP to root my device.
I entered my phone’s recovery mode (this voids your warranty), went into download mode, using download mode and Odin I was able to install TWRP which gives my device a custom recovery screen.
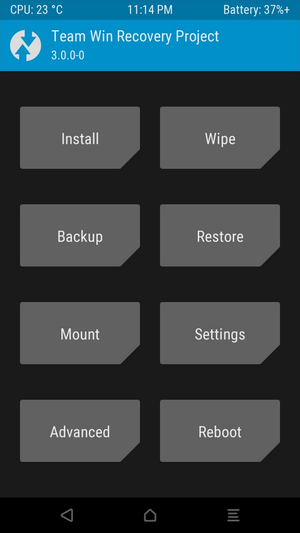
TWRP Recovery Mode
Using the custom recovery I selected the install option and installed SuperSU onto my phone. My phone was now rooted.
HID
What is an HID?
HID or Human Interface Device, is a type of computer device that is designed to take input from humans, essentially keyboards, mouse, touchpads and gaming controllers are all examples of HIDs.
What is a Kernel?
A kernel is basically the core of a computer operating system. It handles the interaction between the hardware and the software of the device and is present in essentially every device someone can interact with.
Finding the code for your kernel may prove difficult depending on your phone manufacturer, for example in my case Samsung does provide code for their kernels however it is not all the code needed to compile a kernel which is a bit of a problem.
The best resource for looking for kernels and their source code for your specific device would be the XDA Forums. Often users post their own modified versions of the kernel which is also fine to use as long as it boots on the phone. I have actually the Quasar kernel for my own device as I had a lot of trouble compiling the kernel code provided by Samsung.
It is very important to use kernels that are designed for your device model. These are a very core part of any device and even a few differences can result in your device not booting or being bricked completely
Why are these important?
Now to see why these are relevant for our Rubber Ducky, what we need to do is enable a mobile phone to identify itself as an HID to a computer. More specifically it will identify itself as a keyboard & mouse to a computer so it may send keystrokes to the machine.
We make use of this repo which from my research has the most information needed for this step.
If your android device has a kernel version of over 3.19 and the kernel has ConfigFS support then you will not need to perform any modifications to the kernel. A rooted phone should work as a Rubber Ducky using this tool.
However if your kernel is of a version lower than 3.19 modifications need to be made. These modifications are known as patching.
Kernel Patching
A patch file in simple terms is a file that indicates all the changes made between two folders. Within the patch file we record the changes made, their file locations and specific lines.
There are ways to automatically apply a patch file to a kernel but often I found those would fail very often due to minor differences within the files in the kernel.
HID patch files can be found here. You may not find the exact patch file you need but it should be okay as long as the kernel version is the same.
Compiling the Kernel
After you have manually applied the changes from the patch file, we now need to compile the kernel.
This process essentially is turning the kernel code into a usable kernel and for this we need something called a toolchain.
By definition a toolchain is a set of tools that compiles code into an executable so that it may run on a target device. The toolchain you use is very important otherwise your kernel will not compile correctly.
Finding the toolchain for your kernel is again reliant on your phone manufacturer. Here again, is where I highly recommend using an already modified kernel from the XDA forums simply because the author of the kernel provides the entire source code of the kernel along with the toolchain they used to compile it. This makes hunting for the right software much much easier.
Compiling a kernel usually takes several commands that are specific to the kernel, device and toolchain. You will need to research accordingly; I will provide the commands I used for reference if needed.
|
|
After the above commands you may have to wait for 10 to 15 minutes as the kernel compiles (time taken depends on the speed of your machine), so sit back for a while.
Kali Nethunter
There is a project called Kali Nethunter that actively focuses on bringing the Kali Linux capabilities to a mobile phone. While some of the tools they introduce are cool and may not require a modified kernel or even a rooted phone. HID attacks on Kali Nethunter do require a modified kernel.
They have already modified the kernel for a few supported devices which can be found here. If you cannot find your device in the list you will have to modify the kernel yourself.
There are sources on their website on how to do so but I do not recommend them as I found them outdated and pointing to the same resources I have mentioned earlier.
Demonstration
Here I will demo the Rubber Ducky and show how someone can take over a machine in just a few seconds.
Prevention
The most important section of this article! How do you stop this from happening to your devices? For Linux the best software I’ve come across is USBGuard, it is extremely simple to use and also barely disrupts daily tasks. I personally use this. For Windows, I did some searching and found one can use GPO on Windows to block the usb drive itself. If you’re interested you can look into that further here.
Unfortunately for Windows & Mac due to lack of being able to find the right software I currently cannot recommend any means to block this attack. Other than being aware of who plugs what into your computer and locking your computer when it is unattended, this type of attack may happen when you least expect it and right in front of you, for example, an attacker may approach you under the guise of needing to charge their phone to make an urgent call and gain access to your device. Always stay vigilant and deny any such requests and also remember if you are attempting to make one for yourself to have fun, stay responsible and ethical!